HATCHERY DISEASE CONTROL PROGRAM

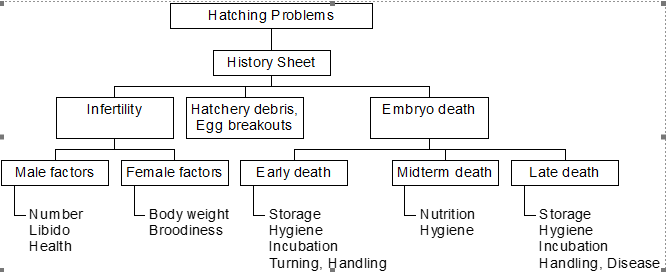
Problems in a chicken hatchery often have their origin on the parent stock farm. To solve these problems we have to follow a systematically procedure. The problem is described in a structural manner by the person initiating the investigation. This is done by completing a history sheet which could include:
 
1. Details about the flock, husbandry practices, the health status, the feeding regime and the egg holding arrangements.
2. We need to know about how the eggs were stored, both on the farm and on the hatchery, and conditions provided during the storage.
3. Interrogation of hatchery records may reveal some useful lines of inquiry. For example, from where the egg comes, etc.
4. The specific hatcher/setter combination is important as one or both may be suspect.
5. It is also worthwhile at this stage to look for husbandry health or nutritional changes on farm.
6. Any changes in temperature, antibody titre or feed change should be suspected.
7. A drop in egg numbers, size, or colour is also valuable information.
 
Diagram Of The Methodological Approach To Hatching Problems
 
Examining Egg
The samples of eggs presented may reveal some feature important in the investigation.
1. The colour of the shell, size and shape of the egg are relevant pieces of information.
2. They may also indicate possible clues to disease status of the flock, farm hygiene and the egg handling system to which the eggs have been subjected.
3. There may be some floor eggs in the sample.
4. open the egg and check the correct hatching position for a term embryo. It should be in a position, body parallel long axis of the egg, with beak under the right wing pointing to the air space. Record any abnormal features about the embryo like the upside down embryo, duplication of limbs or missing of eyes, failure to close over the brain or beak abnormalities.
 
First Period Mortality
It may be either due to improper handling or diseased  health flock. Embryo is susceptible to changes in its environment, whether it may be temperature changes, movement or gaseous changes. Do not take eggs out of the cold store and load them directly into the setter without pre-warming them. Avoid jarring when collection vehicles shake eggs along farm roads. Gassing eggs with Formalin in incubator is also dangerous for both embryos and humans. Poor handling can damage the egg shell and stressed embryo. Regular collection from the nest box reduce the likelihood of pre-incubation and damage from other hens. Egg contamination at this stage, either by laid on floor or in a dirty nest can also affect early embryonic mortality. Washing or dipping in contaminated solutions also create a sort of problem. Flock health problems such as Infectious Bronchitis (IB) will reveal themselves with typically wrinkled and misshapen eggs. The most common cause of early dead germs is egg storage. During storage the egg losses moisture, and a difference in density between the yolk and albumin allows the yolk to rise and meets the air cell membrane and the embryo without any protective membranes stuck to it. Once this happened, it will either rapidly dehydrate or become invaded by bacteria. 
 
Mid Term Mortality
This confined mainly either to nutritional deficiencies or to a carry over of earlier contamination problems. The most common lesions associated with nutrition are clubbed down (Vit. B2 deficiency, may be due to mycotoxins that reduce the availability of vitamin), micromelia and parrot beak (both are due to biotin deficiency).
 
Mortality at Full Term 
Any position which differ from hatching position of the embryo results in failure or delay in hatching. Embryos may be malpositioned in the egg. Low humidity in the hatcher and dehydration results in too dry membranes around the embryo. So high humidity is necessary in the hatcher.  Mortality at full term also reflects the short comings of the early incubation, for example old eggs will delay the hatch and produce more dead-in shell. Turning fault during 1st and 2nd week can have similar effect. Contamination of eggs with mould spores usually results in mortality at this time, as mould are quite slow growing. Lesions associated with the head missing eyes, failure of the cranial to completely encase the brain, unhealed navels are due to high temperature. Large and soft chicks results from too high humidity.
As a thumb rule, any abnormality occurring at an incidence of 10% or more in a batch of dead-in shell is worthy of investigation.
 
Mortality Peaks: First period = 35%, Second period = 8%, Third period = 57%.
 
 
Reducing Bacterial Contamination of Eggs
There is no such thing as sterile egg shell. Even in the oviduct eggs covered with many bacteria. Then there is a major infestation as egg passes the cloaca. 300-500 organism may be found on the shell at the time the egg is laid. Most involves are Salmonella, Pseudomonas, and E.coli. In the presence of heat and moisture within 15 min. after the egg is laid, this number will have increased to 1500-3000. In another hour 20,000-30,000.
To add to these number are those bacteria laid on the shell from material he newly laid eggs comes in contact with, such as floor litter, dirty nesting material and intestinal filth. The no. of organisms found on the average at the time it is picked from the nest or floor can be as follows:
Clean eggs 3,000-3,400 organisms
Soiled eggs 25,000-28,0000 organisms
Dirt eggs 3,90,000-4,30,000 organisms
 
Unless the weather is unusually hot, the egg contents begin to cool, shrink and produce internal suction immediately after the egg is laid.
 
Methods of Sanitising Egg Shell
Shell sanitising is only effective in destroying the remaining bacteria on the shell. There are several methods of sanitising egg shells, but each has its shortcomings.
 
1. Quaternary Ammonia: This a shell bactericide. It is mixed with lukewarm water at 200 PPM.
2.  Quaternary Ammonia Formalin:     A better mixture for spraying eggs. Quaternary ammonia and formalin added to lukewarm water at 156 PPM. Use the following formula:
Formalin (40%) 1 ounce,    Quaternary ammonia 1 ounce,      Lukewarm water      1 gal.
Cautious about not to breath in fumes and wear rubber or plastic gloves.
 
3.  Ozone (O3): It may be generated at low cost and administered at 100 PPM to eggs, held in tight cabinet. It can be administered to eggs in the setter during the first day of incubation. As an egg shell disinfectant it is nearly equal to formaldehyde.
 
 4.  Formaldehyde Gas: It provide excellent bacterial destruction on contact. Hatching eggs should be fumigated on the farm for 30 min. after each egg picked up. For best results, hatching eggs should be sprayed or fumigated while they are still warm. 
 
Hatchery’s Parts in Disease Control Program
Certain pathogenic organisms that produce several chicken diseases may be passed from an infected breeder hen through her eggs to her resultant chicks. To prevent transmission through this route it is necessary that the blood or breeder hens and males be tested. When the reactors to test are found it is necessary that no more eggs be incubated from the entire flock.
Unsanitary conditions in the hatchery will lead to contamination of developing embryos in the setter and of newly hatched chicks in the hatcher. Therefore the hatchery becomes an integral part of any disease prevention program. The following diseases are involved:
 
A.  Pullorum Disease (caused by: Salmonella pullorum)
There is a blood test for identifying any carriers in the breeding flock, but incubators, hatchery equipment, and all coming hatching eggs should be fumigated.
Diagnosis: Organism is easily identified by taking culture form ovary, testicles, liver, spleen and heart.
Testing for Antibodies: Once a bird has been infected with S. pullorum , it will make their appearance in the blood stream. Antibodies formed in response to bacteria , clumped with it in an effort to inactivated it. A similar artificial reaction is used outside the body, through a procedure known as Agglutination Test.
 
(1)    Whole Blood Test
A measured drop (0.5 ml) of antigen (a mixture of killed S. pullorum bacterial cells, dyes, and solvents) is placed on the testing plate. Then punctured the median vein on the underside of the wing and picked up a drop by loop of wire and blood mixed with the antigen. The plate is rotated in a circle. If blood clumps, such a bird is known as reactor and act as a carrier of the S. pullorum. Whole blood test is more rapid, least cost and can be easily conducted in the chicken house.
 
(2)    Tube Agglutination Test.
A large sample of blood is collected by slitting the median vein under the wing, and placed in a large tube until serum separates. This serum separates in the laboratory, and mixed with the antigen. If antibodies are present in the serum (from a reactor) a clumping appears, the clumps falls to the bottom of the test tube leaving the solution in the above of the tube clear. If the birds is non reactor the mixture remain cloudy and uniform.
 
Identifying Carrier
When the breeders are blood tested, the carrier should be identified and removed from the flock. To be certain that all reactors are identified, two blood test, not less than 6 month apart should be conducted. If on a test some reactors are found, the flock should be retested after 21 days. The procedure should be continued until there are no reactors on two consecutive tests.
 
Limitation of Blood Test
1. Cross agglutination between organisms other than S. pullorum, particularly other salmonella, occur, clouding the validity of the test.
2. There are various strains of S. pullorum and if the antigen does not contain bacterial cells of such strains, the test will be unreliable.
3. Antibodies may not have made their appearance, once a bird becomes infected, antibodies begin to appear about a week later. These antibodies number increase until they reach a maximum in about three weeks. During this three week period there may not be an adequate number of antibodies present in the blood to cause a reaction to either of agglutination test.
 
B.  Fowl Typhoid (Salmonella gallinarum):   Detection by blood test as in case of pullorum.
 
C.  Chronic Respiratory Disease (CRD) (caused by: Mycoplasma Gallisepticum)
Over 20 serotypes of Mycoplasma gallisepticum have been discovered and the one involved in this disease is known as S-6. It may be fairly diagnosed by coughing & sniffing. Lab. test involved are:
1. Rapid serum plate or tube agglutination test
2. Hemagglutination  inhibition test
3. Embryonic examination: Infected embryos have lesions in the air sac.
Tylosin is an antibiotic specific for the treatment of birds infected with Mycoplasma gallisepticum. Killed bacteria vaccine can be used to protect the birds from Mycoplasma gallisepticum.
 
D.  Synovitis (caused by: Mycoplasma synoviae)
Mycoplasma synoviae  is similar to Mycoplasma gallisepticum, but there is one serotype and the chicks are distresses because of an inflammation of the joints and tendon sheath. The antigen specific for Mycoplasma gallisepticum must be used for all blood tests. 
Diagnosis: Swelling of the joints of hock and foot pads  are the main symptoms but lab. test will give the reliable diagnosis.
 
1.   Plate Agglutination Test: Blood serum is mixed with MS antigen. As it is an antigen antibody test serum drawn from the birds that have the disease will clump with the antigen. M. gallisepticum antibodies may cause cross agglutination with MS antigen, but opposite is not true.
2.   Bird Inoculation: Material is drawn from suspected hocks, ground stained and injected into the joints of the foot pads of 4 week old chicks. If the donor is infected with MG or MS there will be a definite swelling of the foot pads of the recipient chicks in about a week.
 
Inactivating Mycoplasma Organism Within Hatching Eggs
Methods for inactivating Mycoplasma organism within hatching eggs are not practical to initiate a disease free program. Neither it give assurance to completely inactivate the organism.
 
Egg Dipping To Inactivate Mycoplasma
1.  Temperature Differential System Of Egg Dipping: Hatching eggs are warmed for 3-6 hr. at 100OF, the heat expands the egg contents. Then eggs re dipped in an antibiotic solution for 15 min at 40OF. Not the mycoplasma on the shell dies but some of the antibiotic is drawn through the shell pores as the anterior contents shrinks.
2.   Pressurised Differential System Of Egg Sanitising: Hatching eggs are placed in a tank with tight lid and filled with antibiotic solution at 55-600F. A vacuum pump is connected with the tank and the pressure of the tank is reduced 10.3 inch pressure of mercury, so that the air sucked out but when pressure restored to normal some antibiotic solution enters the egg contents.
 
Marek’s Disease Vaccination in The Hatchery
Marks disease is caused by a group of Beta cell associated Herpes Virus (DNA virus). Symptoms include paralysis of legs with greenish white diarrhoea. Effected nerve (Asiatic nerve) is 2-3 times more thick. Enlargement of liver, ovaries, spleen, kidney, lungs, heart and bursa of fabricious. Preventive measure is to vaccine the bird at day old with dose rate 0.3 ml per bird, via sub/cut.
 
Hatchery Sanitation
A sanitary hatchery is necessary to produce high hatchability and good quality chicks.
 
Specification For Disinfectants:  All disinfectants used in the hatchery should be:
 
1. Highly germicidal.
2. Non toxic to human and birds.
3. Effective in the presence of moderate amount of organic material.
4. Non corroding and non staining.
5. Soluble in water.
6. Capable of penetrating materials and crevices.
7. Unassociated with pungent odours.
8. Readily available and inexpensive. 
 
Cleaning The Hatchery Between Hatches
It is of primary importance to clean the hatchery between hatches. Except for the setter, and setter room, every piece of equipment must be thoroughly vacuumed, scrubbed, disinfected and fumigated. Clean the setter room but do not fumigate it, because developing embryos re sensitive to formaldehyde.
 
Cleaning The Hatcher, Hatcher Room, Hatcher Trays, Chick Room, and Wash Room
1. Remove all racks, trays, carts, and roll out assemblies and clean them. Then dipped them in disinfecting solution.
2. Vacuum the inside and outside of hatcher, remove all debris from the floor and walls.
3. Wash them thoroughly and disinfect remaining equipment’s inside.
4. Return all racks, clean trays from the clean room to the hatcher and fumigate it.
5. After, all the thatching trays and portable equipment’s have been washed and disinfected and taken out for fumigation, remove all debris from the wash room, empty the drain trap. Either incinerate the material removed or place it in plastic bags and remove form the hatchery.
6. Next wash and disinfect the ceiling, walls and floors.
 
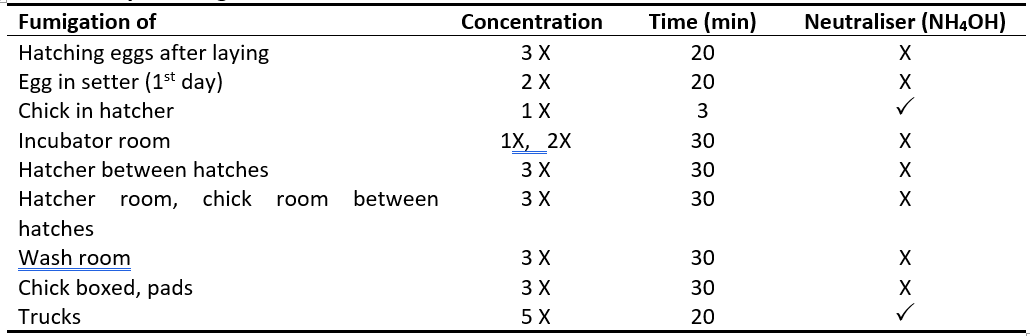
Formaldehyde Fumigation Concentration Recommendations